Always look on the bright side of life: An adaptive night light for RGB LED stripes in MicroPython
This covers a very configurable and more complex variant of measuring brightness and turning on LEDs.
If you are looking for a more basic variant:
- Is it dark yet ? – Measuring brightness with LDR on Pi Pico (W) and ESP8266 (D1 Mini & NodeMCU v3) in MicroPython
- Faster than the shadow – an adapting nightlight in MicroPython
It all began with a LDR and curiosity. The result is a night light for a ESP8266 like D1 Mini or Raspberry Pi Pico (W) which compensates darkness with many configurable features:
- RGB color – choose the color values you want to use
- Fading – smooth brightness change or adapt instantly
- Fading duration – how long should the fading take
- max LED intensity – won’t shine brighter than that
- Min LED intensity – don’t turn off LED when it’s too bright
- Bright dead zone – stop adapting to raising brightness at this point
- Dark dead zone – stop adapting to “darker darkness” at this point
- Change threshold – min brightness change to trigger light change (relative to dead zones)
- Measure interval – how often the voltage value form the LDR is read
- GPIO pins and LED count
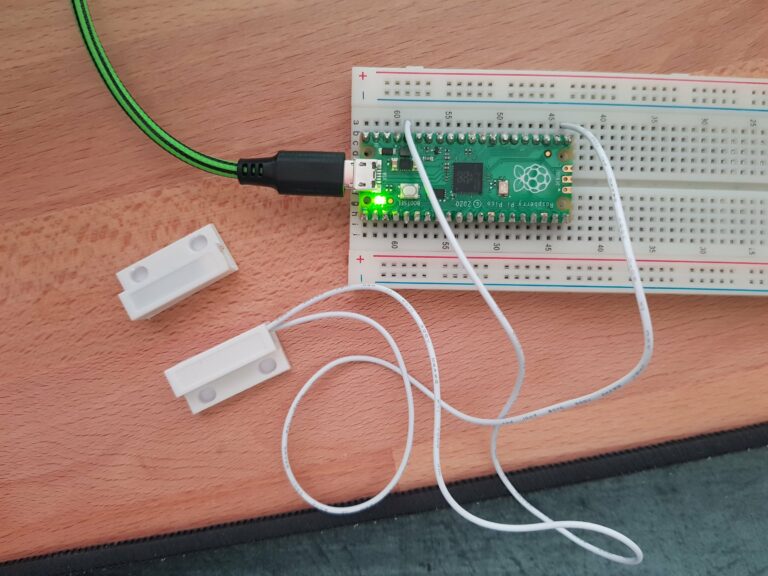
What you need:
- A microcontroller of your choice that supports ADC and MicroPython. Any ESP8266 like D1 Mini, ESP32 or Raspberry Pi Pico (W) will do.
- An LDR measure brightness analog
- Reistor – I used a 56kOhm, but 100k should be fine, too.
- A 5V LED stripe or ring which is supported by NeoPixel. Keep in mind that you need an external power supply when using more LEDs than your microcontroller can power.
- A breadboard for prototyping
- Jumper wires
- Dedicated power supply or USB cable with mini USB connector
- An IDE able to connect to the microcontroller – I use Thonny to flash (and PyCharm to develop)
I kept it as one file for a better overview. The upper part is where you can change values to adapt to your hardware setup and to configure the behavior of the script.
Some constants are derived from the setup values or are just set by hardware like the voltage steps.
The logic is kept as clean and understandable as I could so that you (and I in four weeks) can understand it better.
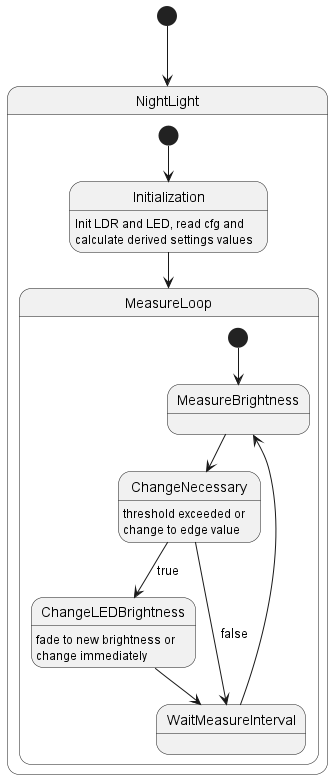
When started, the scripts builds a dict with the available brightness steps according to the given color, intensities and dead zones. The voltage that represents the current light circumstances is then measured in the defined interval. It is checked if a change is necessary (change threshold exceeded). If not, nothing changes and the loop is started again after the measuring interval. If yes, then it is checked if it should fade or instantly change the color. When fading, the duration of the necessary single color steps leading to the final one are calculated. This ensures a color change that is as smooth as possible and within milliseconds of the given fade duration.
Following edge cases are also included:
- Steps leading to min or max step are always executed no matter the threshold as this could lead to not turning off the light when it gets brighter slowly.
- First color step after starting will always be executed no matter the change threshold
- Catching many possible configuration value errors with default values
Calculations necessary only once are done at the start.
from machine import ADC, Pin
from neopixel import NeoPixel
from time import sleep

# ========================== CONFIG - do your setup here ===============================================================
LIGHT_SENSOR_PIN = 0  # pin used for LDR (D1 mini and NodeMCU v3 8266 -> 0, Pi Pico 26, 27 or 28)
MEASURE_INTERVAL_S = 0.3  # 0.5 is 2x per second, 0.005 is 200x per second
PIXEL_PIN = 4  # pin used for LED
PIXEL_COUNT = 8  # LED count
# RGB color values: 0-255 (e.g. warm white). Upscale until highest value is 255 and specify desired brightness  with
# min and max led intensity
COLOR = (255, 150, 100)  # if set to (0,0,0) LED will stay dark
MIN_LED_INTENSITY = 0  # percentage: 0-100 - anything above 0 and light stays on - has to be < MAX_LED_INTENSITY
MAX_LED_INTENSITY = 50  # percentage: 0-100 - won't be exceeded when dark, has to be > MIN_LED_INTENSITY
FADING_ON = True  # if True, fades to new color - if False instantly sets new color
FADING_DURATION_S = 3  # how long it takes to change color
DEAD_ZONE_DARK_START_PERCENT = 20  # 0-100 defines dark dead zone - must be smaller than MAX_BRIGHT
DEAD_ZONE_BRIGHT_START_PERCENT = 80  # 0-100 defines bright dead zone - must be greater than MIN_BRIGHT
CHANGE_THRESHOLD_PERCENT = 5  # 0-100 threshold for brightness change to adapt colors to avoid nervous flickering

# ========================== EXPLANATION - what shit means =============================================================
#
#  dark       >           >             >            environment light            >                >              bright
#  |-----------------------------|-----------------------------------------------------------|-------------------------|
#  ^0                            ^MIN_VOLTAGE_STEP                           MAX_VOLTAGE_STEP^                    65535^
#
#  |-------dark dead zone--------|------NightLight adapts to brightness in this segment------|----bright dead zone-----|
#    DEAD_ZONE_DARK_START_PERCENT^                             DEAD_ZONE_BRIGHT_START_PERCENT^
#
#                                |---|---|---|---|---|---|---|---|---|---|---|---|---|---|---|
#                                |LED bright-----------BRIGHTNESS STEPS--------------LED dark|
#                                ^MIN_BRIGHT_STEP                             MAX_BRIGHT_STEP^
#

# ================ DONT CHANGE THE CODE BELOW UNTIL YOU (THINK YOU) KNOW WHAT YOU ARE DOING :D =========================

# CONSTANTS
# calculates the RGB color base values at given max intensity
RGB = tuple([round(v / 100 * MAX_LED_INTENSITY) for v in COLOR])
# The highest color value in RGB (minus min led intensity) defines the possible brightness steps
# considers the set minimum and maximum brightness setting
# BRIGHTNESS_STEPS = round((max(RGB)-max(RGB)/100*MIN_LED_INTENSITY) * (MAX_BRIGHT_PERCENT - MIN_BRIGHT_PRECENT) / 100)
BRIGHTNESS_STEPS = 1 if max(RGB) == 0 else round(max(RGB) - max(RGB) / 100 * MIN_LED_INTENSITY)
VOLTAGE_STEPS = 65535  # .read_u16() return values in 0-65535
# converts 0-65535 to 0-BRIGHTNESS_STEPS
VOLTAGE_TO_RGB_STEP_DIVISOR = 1 if BRIGHTNESS_STEPS == 0 else round(VOLTAGE_STEPS / BRIGHTNESS_STEPS)
# steps to surpass to trigger change
BOUNCED_SIMILAR_STEPS = 0 if BRIGHTNESS_STEPS == 0 else round(BRIGHTNESS_STEPS / 100 * CHANGE_THRESHOLD_PERCENT)
MIN_BRIGHT_STEP = 0
MAX_BRIGHT_STEP = BRIGHTNESS_STEPS
MIN_VOLTAGE_STEP = round(VOLTAGE_STEPS / 100 * DEAD_ZONE_DARK_START_PERCENT)
MAX_VOLTAGE_STEP = round(VOLTAGE_STEPS / 100 * DEAD_ZONE_BRIGHT_START_PERCENT)


class NightLight:
    """
        Adaptive NightLight \n
        created by Stefan Hildebrand \n
        www.worksonmymachine.de \n

        Compensates darkness with chosen RGB color. \n
        Supports dead zones, change threshold and fading. \n

        You are welcome to use this fro free, \n
        but please do not remove this. \n
        All I want is to take credit for it.
    """

    def __init__(self):
        self.light_sensor = ADC(LIGHT_SENSOR_PIN)
        self.pixels = NeoPixel(Pin(PIXEL_PIN), PIXEL_COUNT)
        self.steps = Steps(RGB, BRIGHTNESS_STEPS, MIN_LED_INTENSITY)

    def run(self):
        previous_step = -1
        while True:
            new_voltage = 0
            try:
                new_voltage = self.light_sensor.read_u16()
            except Exception as e:
                print(f'Error reading LDR sensor: {e}')
                sleep(MEASURE_INTERVAL_S)
            new_step = NightLight.to_brightnes_step(new_voltage)
            # print(f'old: {previous_step} -> new: {new_step}')
            if NightLight.change_necessary(previous_step, new_step):
                try:
                    self.change_to(previous_step, new_step)
                except Exception as e:
                    print(f'Error writing to LEDs: {e}')
                previous_step = new_step
            sleep(MEASURE_INTERVAL_S)

    def change_to(self, previous_step: int, new_step: int) -> None:
        if FADING_ON and previous_step != -1:
            # lambda is for the determination of the next step (as it can get brighter or darker)
            self.fade_to(previous_step, new_step, (lambda x: x + 1) if new_step > previous_step else (lambda x: x - 1))
        else:
            self.change_color(new_step)

    def fade_to(self, previous_step: int, new_step: int, next_step) -> None:
        # print(f'fading to step {new_step}')
        delay = round(FADING_DURATION_S / abs(previous_step - new_step), 3)  # delay for each step in the current change
        start_step = next_step(previous_step)  # starting point is first step after previous. next_step gives direction
        while start_step != next_step(new_step):  # doing this until we reached the desired step (one more for last)
            self.change_color(start_step)
            start_step = next_step(start_step)
            sleep(delay)

    def change_color(self, step: int) -> None:
        # print(f'setting colors for step {step}')
        self.pixels.fill(self.steps.get_color(step))
        self.pixels.write()

    @staticmethod
    def to_brightnes_step(voltage_step: int) -> int:
        # filtering values outside min and max brightness steps
        if voltage_step <= MIN_VOLTAGE_STEP:
            return MIN_BRIGHT_STEP
        if voltage_step >= MAX_VOLTAGE_STEP:
            return MAX_BRIGHT_STEP
        return round(voltage_step / VOLTAGE_TO_RGB_STEP_DIVISOR)

    @staticmethod
    def change_necessary(previous_step: int, new_step: int) -> bool:
        return (NightLight.is_change_to_edge_step(previous_step, new_step)
                or NightLight.is_similarity_threshold_exceeded(previous_step, new_step))

    @staticmethod
    def is_change_to_edge_step(previous_step: int, new_step: int) -> bool:
        # ensures color change is triggered when reaching an edge step even if similarity threshold
        # is not exceeded. especially for turning off when it gets brighter gradually and the last
        # change was too close to the maximum brightness to exceed the threshold to turn the light off
        return ((previous_step > MIN_BRIGHT_STEP and new_step == MIN_BRIGHT_STEP)
                or (previous_step < MAX_BRIGHT_STEP and new_step == MAX_BRIGHT_STEP))

    @staticmethod
    def is_similarity_threshold_exceeded(previous_step: int, new_step: int) -> bool:
        #  checks if in step limits and if similarity threshold was exceeded
        start = previous_step - BOUNCED_SIMILAR_STEPS  # to avoid duplicate code in ternary
        start = start if start >= MIN_BRIGHT_STEP else MIN_BRIGHT_STEP
        end = previous_step + 1 + BOUNCED_SIMILAR_STEPS  # to avoid duplicate code in ternary
        end = end if end <= MAX_BRIGHT_STEP else MAX_BRIGHT_STEP
        return new_step not in range(start, end + 1)


class Steps:
    def __init__(self, rgb: (int, int, int), steps: int, min_brightness_percent: int):
        #  builds a dict which defines which RGB values to set for the current brightness step (voltage measured at LDR)
        #  uses a dict comprehension iterating over each available color step and calculates the RGB value tuple
        #  for each step in the inner loop
        #  looks like this when generated: {0: (200, 200, 200), 100: (100, 100, 100), 200: (0, 0, 0)}
        self.step_amount = steps
        self.min_brightness_percent = min_brightness_percent
        self.steps = {step: tuple((self.to_color_value(color, step) for color in rgb)) for step in range(steps + 1)}

    def get_color(self, step: int) -> (int, int, int):
        return self.steps[step]

    def to_color_value(self, color_value: int, step: int) -> int:
        #  changes color intensity inversely proportional to compensate for darkness and to turn light off when bright
        min_brightness = (color_value / 100 * self.min_brightness_percent)
        return round(color_value - (color_value / self.step_amount * (step - min_brightness)))


if __name__ == '__main__':
    NightLight().run()
I had a lot of fun building this. Pictures of the finished gadget will follow when I find time to build it.
Leave a comment!